Troubleshooting PC Boot Issues: A Step-by-Step Guide

Troubleshooting PC boot issues involves systematically diagnosing hardware problems, from checking power supply connections and RAM modules to scrutinizing the motherboard and storage devices, to identify and resolve the cause of the computer’s failure to start.
Experiencing PC boot issues can be incredibly frustrating, especially when you’re eager to dive into your favorite games. Troubleshooting PC boot issues: A step-by-step guide to diagnosing hardware problems can save you time and stress by helping you identify and resolve the problem efficiently.
Understanding the Basics of PC Booting
Before diving into troubleshooting, it’s essential to understand the basic process of how a PC boots up. Knowing the sequence of events can help you pinpoint where things might be going wrong. The process involves several key steps, each of which relies on different hardware components.
The Power-On Self-Test (POST)
The Power-On Self-Test, or POST, is the first stage of the boot process. During POST, the computer’s BIOS (Basic Input/Output System) or UEFI (Unified Extensible Firmware Interface) runs a series of diagnostic tests to ensure all hardware components are functioning correctly. This includes checking the CPU, RAM, graphics card, and storage devices.
The BIOS/UEFI Phase
Once the POST is complete, the BIOS or UEFI takes over. This firmware is responsible for initializing the hardware and configuring the system. It also searches for a bootable device, which is typically a hard drive or SSD containing the operating system.
- Power Supply: Ensures stable power delivery to all components.
- CPU: The central processing unit must be functional for the system to initialize.
- RAM: Random Access Memory is essential for loading the operating system.
- Storage Devices: Includes hard drives and SSDs, where the operating system resides.
Understanding these basics allows you to approach troubleshooting with a clearer perspective. Knowing what should happen during each stage can help you identify where the process is failing.
Checking the Power Supply
One of the most common causes of PC boot issues is a faulty or inadequate power supply. The power supply unit (PSU) provides power to all components, and if it’s not functioning correctly, the system won’t boot. Here’s how to check the power supply to ensure it’s not the culprit.
Visual Inspection
Start with a visual inspection of the power supply. Look for any signs of damage, such as bulging capacitors, burnt components, or loose wires. If you notice any of these issues, the PSU may need to be replaced.
Testing with a Multimeter
A multimeter can be used to test the voltage output of the PSU. Disconnect the PSU from all components and use a PSU tester or multimeter to check the voltage on the various connectors. Compare the readings to the expected values (e.g., 12V, 5V, 3.3V). Significant deviations can indicate a faulty PSU.
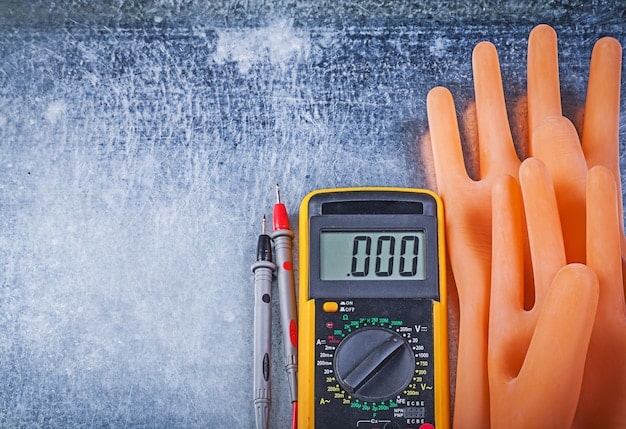
- Ensure the PSU is properly connected: Check all cables and connections.
- Test with a known working PSU: If possible, swap the suspect PSU with one you know is working.
- Listen for unusual noises: Buzzing or clicking sounds can indicate PSU issues.
Checking the power supply is a crucial first step in troubleshooting boot issues. A faulty PSU can prevent the system from starting or cause intermittent problems, so it’s important to rule it out early.
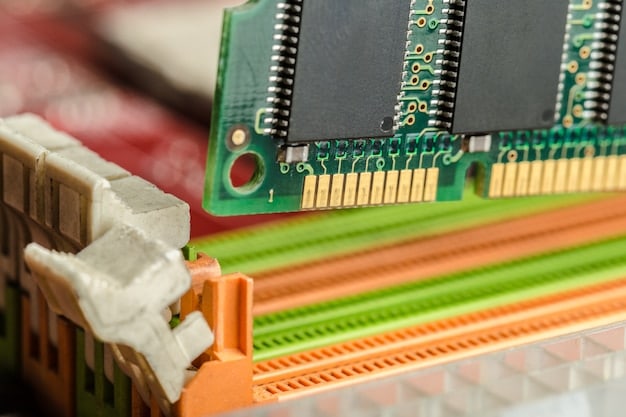
Inspecting RAM Modules
Random Access Memory (RAM) is critical for the computer to boot properly. Faulty or improperly installed RAM can prevent the system from starting or cause it to crash during the boot process. Here’s how to inspect and troubleshoot RAM modules.
Reseating the RAM
Sometimes, RAM modules can become dislodged from their slots. Turn off the computer, open the case, and gently reseat each RAM module. Ensure they click into place and are securely fastened in the slots.
Testing One Module at a Time
If you have multiple RAM modules, try booting the computer with only one module installed. If the system boots, repeat the process with each module individually to identify if a specific module is causing the issue. This helps isolate faulty RAM.
- Memtest86+: Use Memtest86+ to scan your ram.
- Check Compatibility: Ensure that the RAM modules are compatible with your motherboard.
- Look for Physical Damage: Inspect the modules for any signs of physical damage, such as bent pins or burnt spots.
Inspecting and testing RAM modules is a straightforward way to diagnose boot problems. Faulty RAM can prevent the system from starting, so it’s important to verify that the RAM is functioning correctly.
Examining the Motherboard
The motherboard is the central hub of the computer, connecting all the components. Problems with the motherboard can cause a variety of boot issues. Here’s how to examine the motherboard for potential problems.
Visual Inspection for Damage
Start by visually inspecting the motherboard for any signs of damage, such as bulging or leaking capacitors, burnt components, or broken connectors. These physical damages can indicate serious problems.
Checking Connections and Jumpers
Ensure all cables and connectors are securely attached to the motherboard. Check that the front panel connectors (power button, reset button) are correctly connected. Also, verify the jumper settings for CMOS (Complementary Metal-Oxide-Semiconductor) reset and other configurations.
- BIOS/UEFI Reset: Resetting the BIOS/UEFI to its default settings can resolve boot issues caused by misconfigured settings.
- Check for BIOS Updates: Ensure your BIOS/UEFI is up to date.
- Test with Minimal Components: Disconnect non-essential components to isolate the issue.
Examining the motherboard is crucial, as it’s the foundation of the entire system. Identifying physical damage or connection problems early can save time and prevent further damage.
Analyzing Storage Devices
Storage devices, such as hard drives (HDDs) and solid-state drives (SSDs), store the operating system and other critical data. Issues with these devices can prevent the computer from booting. Here’s how to analyze storage devices for potential problems.
Checking Connections
Ensure that the SATA or NVMe cables connecting the storage devices to the motherboard are securely attached. Loose connections can prevent the system from recognizing the drive.
Testing with a Different Port
Try connecting the storage device to a different SATA or NVMe port on the motherboard. This can help determine if the port itself is the problem.
- Check Boot Order: Ensure the correct storage device is set as the primary boot device in the BIOS/UEFI settings.
- Use Diagnostic Tools: Run manufacturer-specific diagnostic tools or third-party software to check the health and status of the storage device.
- Look for Unusual Noises: Listen for any unusual noises, such as clicking or grinding, which can indicate a failing hard drive.
Analyzing storage devices is essential, as they contain the operating system needed to boot the computer. Ensuring proper connections and verifying the health of the drive can resolve many boot issues.
Diagnosing the Graphics Card
The graphics card is responsible for displaying images on the monitor, and issues with the graphics card can sometimes prevent the system from booting. Here’s how to diagnose the graphics card for potential problems.
Reseating the Graphics Card
Turn off the computer and carefully reseat the graphics card in its PCIe slot. Ensure it is securely fastened and that all power connectors are properly attached.
Testing with a Different Card
If possible, try booting the computer with a different graphics card to see if the issue persists. This can help determine if the original graphics card is faulty.
- Check Monitor Connection: Verify the monitor is properly connected to the graphics card.
- Update Graphics Drivers: Boot into safe mode and update the graphics drivers.
- Test Integrated Graphics: If your CPU has integrated graphics, try booting with the dedicated graphics card removed.
Diagnosing the graphics card is an important step, especially if you’re experiencing display-related boot problems. Ensuring the card is properly seated and testing with a different card can help identify the issue.
Additional Troubleshooting Steps
If you’ve checked the power supply, RAM, motherboard, storage devices, and graphics card, and the PC still won’t boot, there are additional troubleshooting steps you can take. These steps involve more advanced techniques and can help pinpoint more obscure issues.
Checking External Devices
Disconnect all external devices, such as USB drives, printers, and external hard drives. Sometimes, these devices can interfere with the boot process. Try booting the computer with only the essential components connected.
Using a Bootable USB Drive
Create a bootable USB drive with a diagnostic tool or a minimal operating system. This can help you determine if the issue is with your primary operating system installation. Tools like Hiren’s BootCD or a Linux live USB can be useful.
- System Restore: If you can access the recovery options, try performing a system restore to a previous working state.
- Check Error Messages: Pay close attention to any error messages displayed during the boot process. These messages can provide valuable clues about the problem.
- Consult Online Resources: Look for solutions online.
These additional troubleshooting steps can help resolve more complex boot issues. By systematically checking external devices and using diagnostic tools, you can identify and address the root cause of the problem.
| Key Point | Brief Description |
|---|---|
| 💡 Power Supply Check | Ensuring PSU provides stable power is crucial for boot. |
| ⚙️ RAM Inspection | Reseat RAM modules and test individually. |
| 🔍 Motherboard Examination | Look for physical damage or connection issues. |
| 💾 Storage Devices Analysis | Check connections and health of HDDs/SSDs. |
Frequently Asked Questions
▼
This can be due to various reasons, including faulty RAM, a failing hard drive, or issues with the motherboard. Check each component systematically to identify the cause.
▼
Signs of a failing power supply include the computer not turning on, intermittent shutdowns, or unusual noises coming from the PSU. Testing with a multimeter can confirm voltage issues.
▼
Beep codes can indicate specific hardware problems. Consult your motherboard manual to identify the meaning of the beep code and address the corresponding issue.
▼
Yes, a faulty graphics card can prevent the PC from booting. Try reseating the card or testing with a different one to see if the issue is resolved.
▼
You can reset the BIOS by accessing the BIOS settings during startup and selecting the option to restore default settings. Alternatively, you can remove the CMOS battery for a few minutes.
Conclusion
Troubleshooting PC boot issues can seem daunting, but by following a systematic approach and checking each component, you can often identify and resolve the problem. Remember to start with the basics, such as the power supply and RAM, and gradually move to more complex components like the motherboard and graphics card. With patience and persistence, you can get your PC up and running again.


